If you used the Barracuda SSL VPN web interface to create your CSR instead of the DigiCert Certificate Utility, see Barracuda SSL VPN – SSL Certificate Installation for instructions on how to install your SSL Certificate.
Barracuda SSL VPN CSR Creation: Using the DigiCert Certificate Utility
Before using the DigiCert Certificate Utility to install your SSL Certificate, you first need to use it to create a CSR. See Barracuda SSL VPN: CSR Creation with the DigiCert® Certificate Utility for Windows.
To install your SSL Certificate on your Barracuda SSL VPN device, complete the steps below.
-
Import your SSL Certificate to your Microsoft server or workstation.
How to Import Your SSL Certificate Using the DigiCert Certificate Utility
-
Export your SSL Certificate in an Apache compatible format.
How to Export Your SSL Certificate Using the DigiCert Certificate Utility
-
Install the SSL Certificate on your Barracuda SSL VPN device.
How to Import the SSL Certificate to Your Barracuda SSL VPN Device
-
(Optional) Delete the SSL Certificate from your personal computer.
How to Remove the SSL Certificate from Your Personal Computer
i. How to Import Your SSL Certificate Using the DigiCert Certificate Utility
After you receive your SSL Certificate, you need to install it on your Microsoft server or workstation. Then, you can use the certificate utility to export it an Apache file format, which can then be uploaded to your Barracuda SSL VPN device.
-
On the Windows server or workstation where you created the CSR, copy your SSL Certificate (i.e. your_domain_com.cer) to the folder where you saved the DigiCert® Certificate Utility for Windows executable (DigiCertUtil.exe).
-
Run the DigiCert® Certificate Utility for Windows.
Double-click DigiCertUtil.
-
In the DigiCert Certificate Utility for Windows©, click SSL (gold lock), and then, click Import.

-
In the Certificate Import window, browse for and select the your_domain_com.crt file and then, click Next.
-
Enter a friendly name for the certificate. You will use this name to identify this certificate when assigning it to a website.
We recommend that you add DigiCert and the expiration date to the end of your friendly name, for example: yoursite-DigiCert-(Expiration Date). This information helps identify the issuer and expiration date for each certificate. It also helps to distinguish multiple certificates with the same domain name.

-
Click Finish.
You should receive a message that the certificate was successfully imported.
-
You should now see your SSL Certificate for your.domain.com lin the certificate utility listed in the SSL Certificates section.

-
You are now ready to export your SSL Certificate and private key in the Apache format for uploading to your Barracuda SSL VPN device.
ii. How to Export Your SSL Certificate Using the DigiCert Certificate Utility
-
Run the DigiCert® Certificate Utility for Windows.
Double-click DigiCertUtil.
-
In the DigiCert Certificate Utility for Windows©, click SSL (gold lock), select your SSL Certificate for your Barracuda SSL VPN device, and then, click Export Certificate.

-
On the Certificate Export page, select Yes, export the private key, then select key file (Apache compatible format), and finally, click Next.

-
Click … to browse for and select the location and file name where you want to save the .key and .crt files. Then, click Finish.

-
You should receive a message that the certificate was successfully exported.
-
You are now ready to upload your SSL Certificate and private key in the Apache format to your Barracuda SSL VPN device.
iii. How to Import the SSL Certificate to Your Barracuda SSL VPN Device
Now that you have your private key file (your_domain_com.key), and all necessary certificate files in Apache format (your_domain_com.crt and DigiCertCA.crt) created with a 2048 bit CSR, you are now ready to upload the files to the Barracuda SSL VPN device.
-
Log into the Barracuda SSL VPN device web interface.
-
In the SSL VPN Device Web Interface, click Basic > SSL Certificate.
-
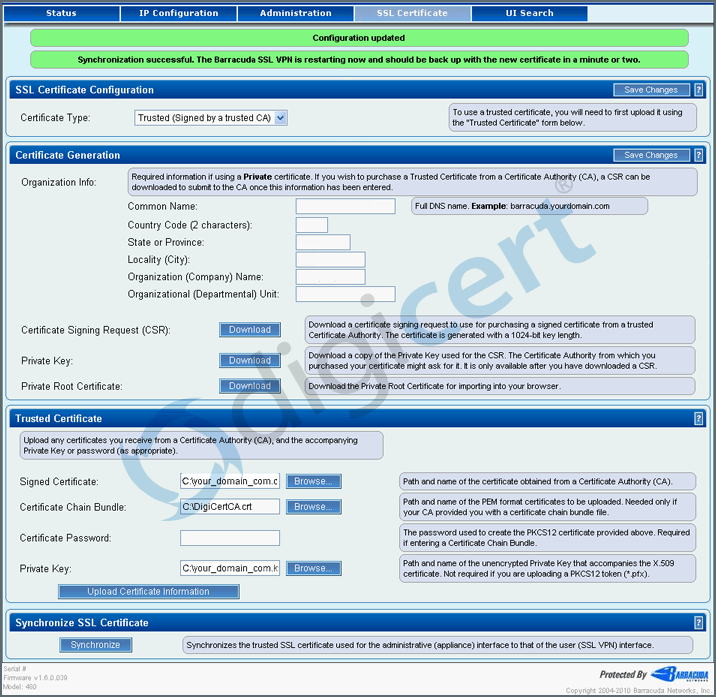
On the SSL Certificate page, in the Trusted Certificate section, do the following:
-
To the right of Signed Certificate, click Browse and then, browse for and select the your_domain_com.crt file.
-
To the right of Certificate Chain Bundle, click Browse and then, browse for and select the DigiCertCA.crt file.
-
To the right of Private Key, click Browse and then, browse for and select the your_domain_com.key file.

-
-
When you are finished, click Upload Certificate Information.
-
In the SSL Certificate Configuration section, in the Certificate Type drop-down list select Trusted (Signed by a trusted CA) and then click Save Changes.

-
In the Synchronize SSL Certificate section, click Synchronize.

-
You should see the following messages in green bars at the top of the page:
-
Configuration Updated
-
Synchronization successful. The Barracuda SSL VPN is restarting and should be back up with the new certificate in a minute or two.

-
-
When Barracuda SSL VPN restarts, your certificate should be installed on your Barracuda SSL VPN device.
iv. How to Remove the SSL Certificate from Your Personal Computer
After you have successfully imported the SSL Certificate to the Barracuda device, if you exported the SSL Certificate from your personal computer with the DigiCert Certificate Utility, as a security precaution it is recommended that you delete the certificate from your computer.
-
Run the DigiCert® Certificate Utility for Windows.
Double-click DigiCertUtil.
-
In the DigiCert Certificate Utility for Windows©, click SSL (gold lock), right-click the SSL Certificate that you exported to your Barracuda SSL VPN device, and then, click Delete Certificate.

-
In the Confirm Delete – DigiCert Certificate Utility for Windows© window, click Yes.

Test Your Installation
If your website is publicly accessible, our DigiCert® SSL Installation Diagnostics Tool can help you diagnose common problems.