If your Barracuda SSL VPN device interface does not support the creation of a 2048 bit certificate signing request (CSR), or if you are looking for a simpler way to create CSRs and install and manage your SSL Certificates, we recommend that you use the DigiCert® Certificate Utility for Windows. If you have a Microsoft server or workstation, you can use the DigiCert® Certificate Utility for Windows to generate your CSR and more. See Barracuda SSL VPN: CSR Creation with the DigiCert® Certificate Utility for Windows.
Barracuda SSL VPN: Generating Your CSR
If your Barracuda SSL VPN device web interface supports the creation of a 2048 bit certificate signing request (CSR), you can use its web interface to create your CSR.
If you already have your SSL, Intermediate, and Root Certificates .crt files, and you just need to install them, see Barracuda SSL VPN – SSL Certificate Installation.
How to Use the Barracuda User Interface to Generate Your CSR
-
Log into the Barracuda SSL VPN device web interface.
For example: https://sslvpn.example.com:8443
-
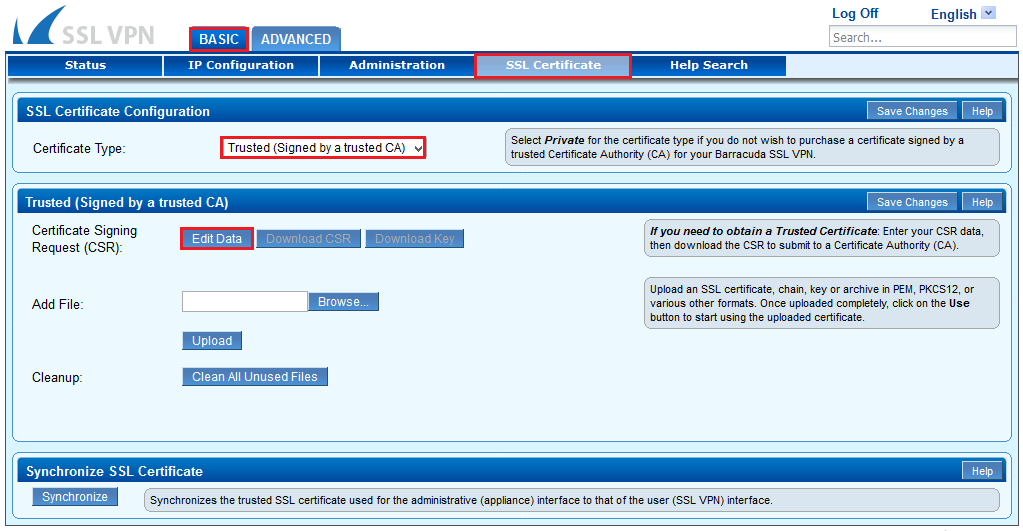
In the SSL VPN Web Interface, click Basic > SSL Certificate.

-
On the SSL Certificate page, in the SSL Certificate Configuration section, in the Certificate Type drop-down list, select Trusted (Signed by a trusted CA).
-
In the Trusted (Signed by a trusted CA) section, click Edit Data.
-
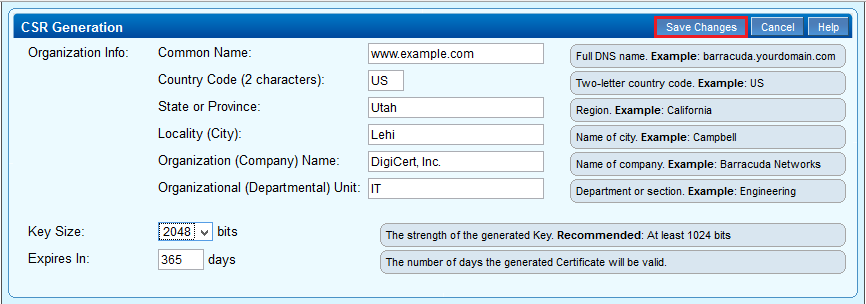
In the CSR Generation window, enter the following information:
Common Name You must enter the full DNS (domain name system) name (i.e. sslvpn.example.com). Country Code (2 characters) Enter the two digit country code for the country where your company is legally located. If you don’t know your country’s two digit code, see SSL Certificate Country Codes. State or Province Enter the state or Province in which your company is legally located. Locality (City) Enter the city in which your company is legally located. Organization (Company) Name Enter your company’s legally registered name (i.e. YourCompany, Inc.). Organizational (Department) Unit Enter the name of your department within the organization. (Frequently this entry will be listed as "IT" or "Web Security") Key Size In the drop-down list, select 2048. Expires In N/A (use default setting) 
-
When you are finished entering your information, click Save Changes.
-
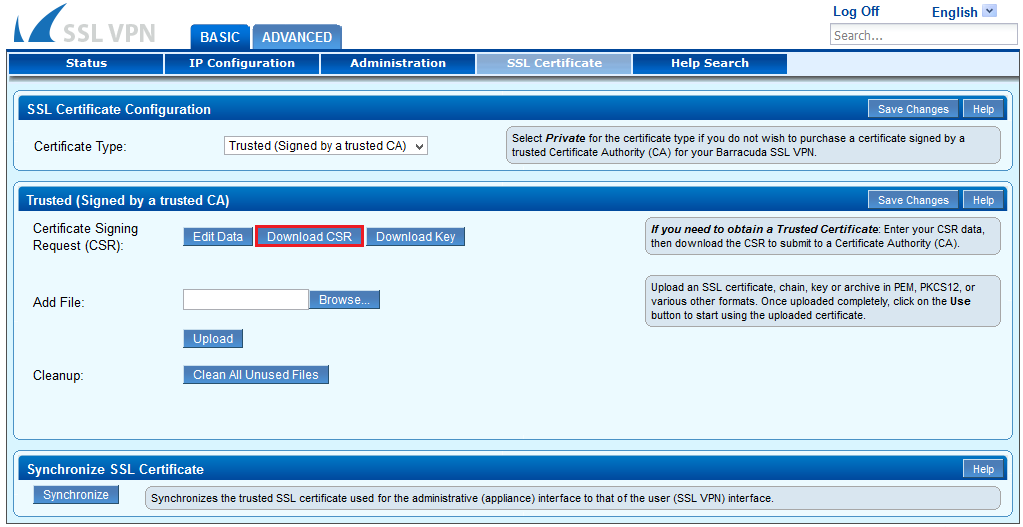
On the SSL Certificate page, in the Trusted (Signed by a trusted CA) section, click Download CSR and then save a copy of your CSR.

-
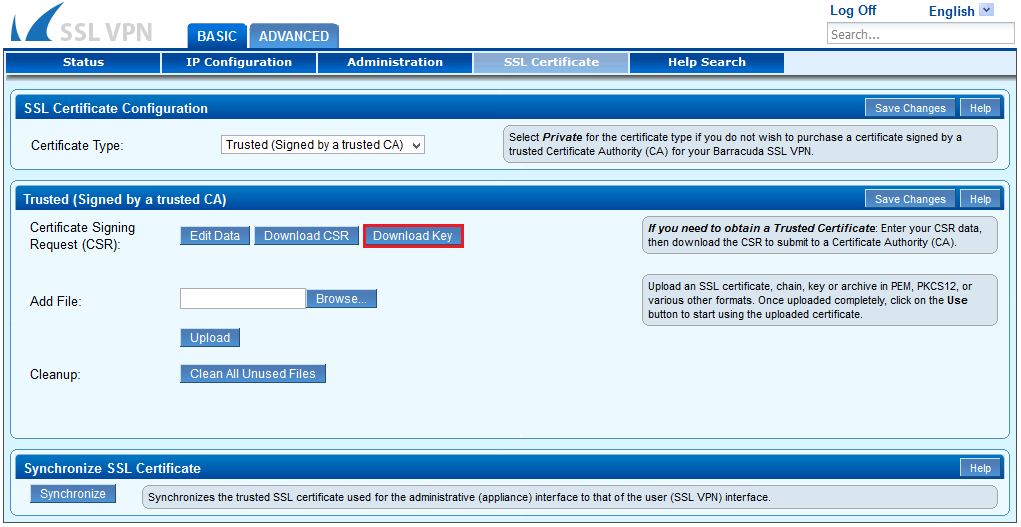
(Optional) In some cases, you may need to download the private. Click Download Key to download the private key (private_key.txt).
Save this file in a secure place as it may be needed later when you install your SSL Certificate files.

-
Use a text editor to open the CSR file. Then, copy the text, including the BEGIN CERTIFICATE REQUEST and END CERTIFICATE REQUEST tags, and enter it into the DigiCert order form.
Sample CSR:-----BEGIN CERTIFICATE REQUEST----- MIICvDCCAaQCAQAwdzELMAkGA1UEBhMCVVMxDTALBgNVBAgMBFV0YWgxDzANBgNV BAcMBkxpbmRvbjEWMBQGA1UECgwNRGlnaUNlcnQgSW5jLjERMA8GA1UECwwIRGln aUNlcnQxHTAbBgNVBAMMFGV4YW1wbGUuZGlnaWNlcnQuY29tMIIBIjANBgkqhkiG 9w0BAQEFAAOCAQ8AMIIBCgKCAQEA8+To7d+2kPWeBv/orU3LVbJwDrSQbeKamCmo wp5bqDxIwV20zqRb7APUOKYoVEFFOEQs6T6gImnIolhbiH6m4zgZ/CPvWBOkZc+c 1Po2EmvBz+AD5sBdT5kzGQA6NbWyZGldxRthNLOs1efOhdnWFuhI162qmcflgpiI WDuwq4C9f+YkeJhNn9dF5+owm8cOQmDrV8NNdiTqin8q3qYAHHJRW28glJUCZkTZ wIaSR6crBQ8TbYNE0dc+Caa3DOIkz1EOsHWzTx+n0zKfqcbgXi4DJx+C1bjptYPR BPZL8DAeWuA8ebudVT44yEp82G96/Ggcf7F33xMxe0yc+Xa6owIDAQABoAAwDQYJ KoZIhvcNAQEFBQADggEBAB0kcrFccSmFDmxox0Ne01UIqSsDqHgL+XmHTXJwre6D hJSZwbvEtOK0G3+dr4Fs11WuUNt5qcLsx5a8uk4G6AKHMzuhLsJ7XZjgmQXGECpY Q4mC3yT3ZoCGpIXbw+iP3lmEEXgaQL0Tx5LFl/okKbKYwIqNiyKWOMj7ZR/wxWg/ ZDGRs55xuoeLDJ/ZRFf9bI+IaCUd1YrfYcHIl3G87Av+r49YVwqRDT0VDV7uLgqn 29XI1PpVUNCPQGn9p/eX6Qo7vpDaPybRtA2R7XLKjQaF9oXWeCUqy1hvJac9QFO2 97Ob1alpHPoZ7mWiEuJwjBPii6a9M9G30nUo39lBi1w= -----END CERTIFICATE REQUEST-----
-
After you receive your SSL, Intermediate, and Root Certificate .crt files from DigiCert, you can install them.