
From simple to complex configurations, there are times you need to check on how your DNS is behaving. Luckily, computers have a built-in utility that can help you do just that. This resource covers useful commands in Windows Command Prompt and PowerShell. It also touches on the differences between the two shells. Ready? Of course you are, that’s why you’re here, right? Oh, who am I kidding? You probably skipped this part and went straight to the commands. Fine. Be that way.
Note: All examples are from a system running Windows 10.
Windows Command Prompt vs Windows PowerShell
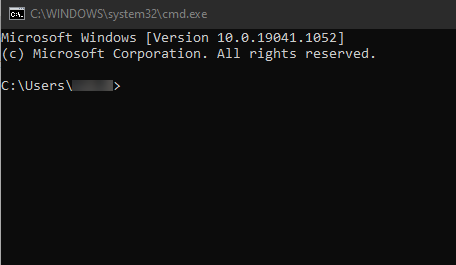
Windows introduced its original Command Prompt (CMD) for Microsoft operating systems in 1981. This program works “beneath” Windows and gives you more control over your system. It runs in a simple black window that displays a prompt. Depending on your machine, the prompt should look like this: C:\> or C:\Users\example. With this tool, you can run single-line commands.
PowerShell was first released on Windows in 2006. This shell runs in a blue window and uses Command lets (cmdlets) instead of CMD or MS-Dos commands. It features a scripting system, built-in administrative capabilities, and can run batch commands. This means you can complete a series of cmdlets as opposed to only one command at a time. Unlike Command Prompt, PowerShell isn’t limited to console programs. The current release runs on .Net 5.0, which supports Linux and macOS. PowerShell can also access multiple libraries across various systems.

How to Access Windows Command Prompt
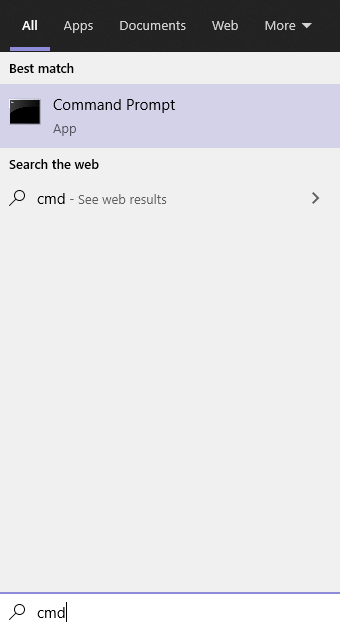
There are several ways to start Windows Command Prompt. One way is to click on the search icon in your taskbar and type “command prompt” or “cmd.” This should put the app at the top of the search window under “Best match.”
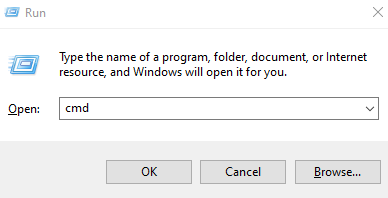
If you like keyboard shortcuts like I do, you can press Win + R to pull up the Run command. Type cmd and click okay. Boom, you’re in!
Accessing Windows PowerShell
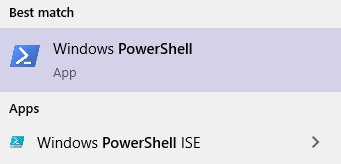
You can access PowerShell in the exact same way as Windows Command Prompt. Instead of typing cmd, you would type PowerShell in the Search or Run Command window. Using the search option is where things differ. If you take the search route, you will see an option for Windows PowerShell and PowerShell ISE. In this resource, I’ll be using the basic Windows PowerShell.
Alternatively, you can press Win + X, which will pull up a new menu. Doing this will give you the option to access PowerShell as Admin. This menu also includes Run and several other Windows Utilities.
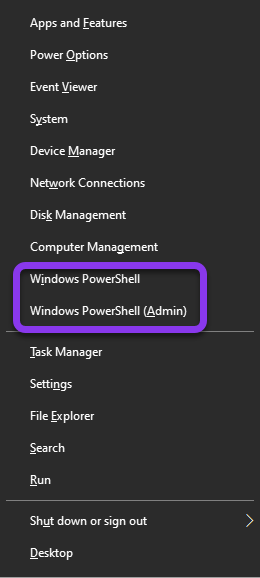
Did you know?: PowerShell ISE is a host application for PowerShell. ISE stands for Integrated Scripting Environment. This option provides an interface, whereas standard PowerShell looks more like Command Prompt.
Windows Command Prompt Commands For DNS
Okay, now for the really good stuff! Here’s several Windows CMD commands that can help troubleshoot or verify your DNS. Don’t worry. I have a very active imagination. I’ll pretend that you didn’t skip all my hard work above and come straight here.
Nslookup
The nslookup command is helpful in diagnosing issues with DNS name resolution. This command is comparable to Mac or Linux’s dig function. It can find the IP address of a host or perform a reverse DNS lookup (to find the domain name of an IP). Nslookup can also provide information on DNS records for your domain.
An nslookup command would look like this: C:\Users\username>nslookup dnsmadeeasy.com
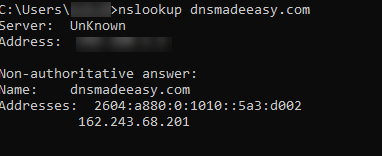
In this example, I did a simple request for the IP address for DNS Made Easy. In response, I received the IPv6 and IPv4 address for the domain. The reason it says “non-authoritative answer” is because I’m using a recursive server for the query.
Reverse DNS Lookup
If you have an IP address and need the domain name, you can do a reverse DNS lookup. This is the same as the above example, just in—you guessed it—reverse:
C:\Users\username>nslookup 162.243.68.201

Set Command
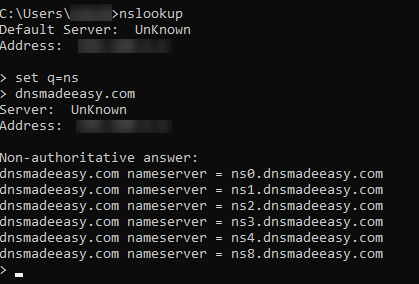
Let’s say you want to find the nameserver for a domain or set a specific parameter in your command line. For this, you would use the Windows set command. Here’s an example:
C:\Users\username>nslookup
>set q=ns
>dnsmadeeasy.com
(press enter after each command)
The result should look something like this:
DNS Record Lookup
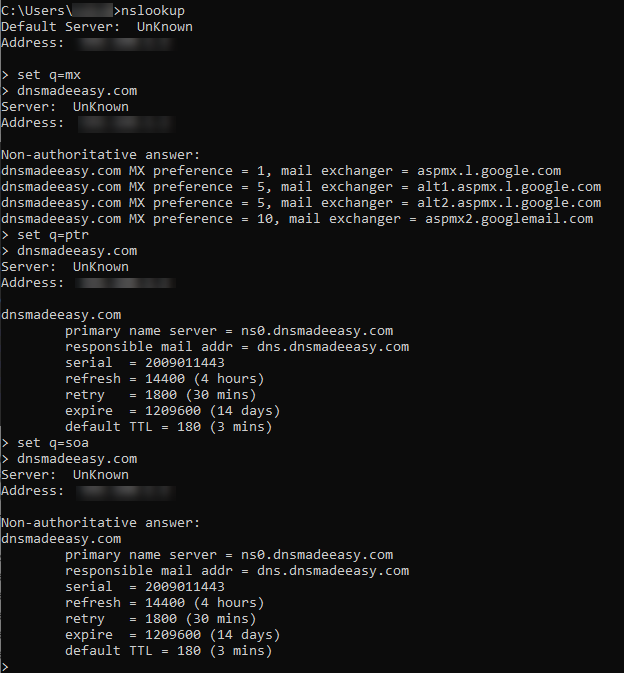
You can also use the nslookup and set command to verify or troubleshoot DNS records for your domain. This process is the same as the above example, but this time, you’ll specify which record you want to query. You can address any errors or issues you discover from this information quickly. In the screenshot below, I performed a lookup for MX, PTR, and SOA records, but of course, you aren’t limited to only those.
C:\Users\username>nslookup
>set q=mx
>dnsmadeeasy.com
(press enter after each command)
Tip: If you’re checking multiple record types, you don’t need to type “nslookup” for each one. After the initial nslookup command, you can run set commands for each record. This applies even if you start verifying records for another domain.
DNS Record Command Results – Definitions
- Responsible mail addr – Represents the email of the domain administrator
- Serial – This is the serial number of the zone file
- Refresh – The time a secondary DNS server will take to request new information if a primary server’s serial number has changed
- Rety – If a primary server doesn’t respond to a request, it will reconnect within this timeframe
- Expire – Secondary DNS cache expiration time
- Default TTL – Refers to how long a record is cached before it’s refreshed
Tip: It may be helpful to clear your DNS cache before performing commands. To do this, type: ipconfig/flushdns and then press enter. Your cache should now be cleared.
DNS Debug Command
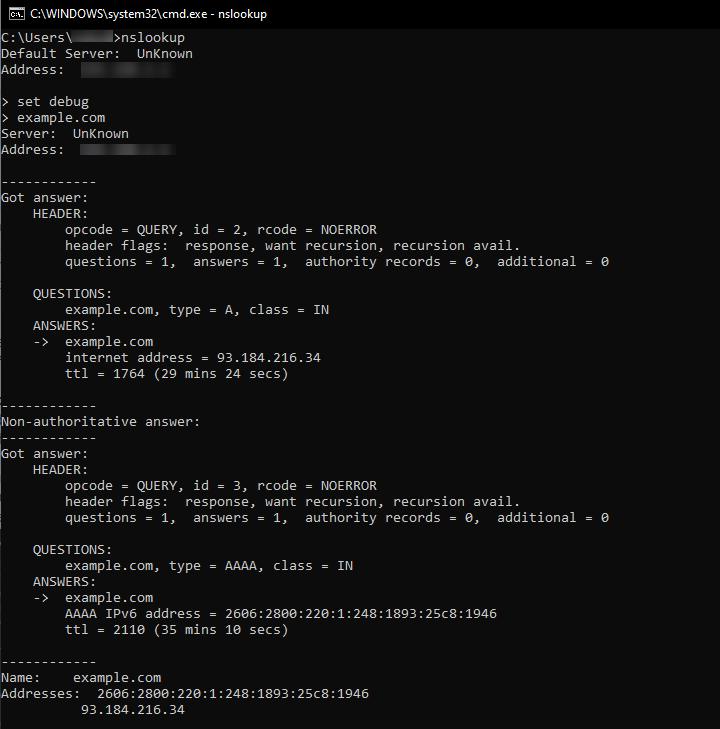
To get additional details about your domain’s DNS, you can use the debug command. This will provide the header information of DNS server requests (see screenshot below).
C:\Users\username>nslookup
>set debug
>example.com
Ping Command
For network diagnostics, you can run a ping command in CMD. A ping measures the latency of a connection for a target location. For demonstration purposes, I’ll run a ping test using 8.8.8.8, Google’s public DNS address.
C:\Users\username>Ping 8.8.8.8
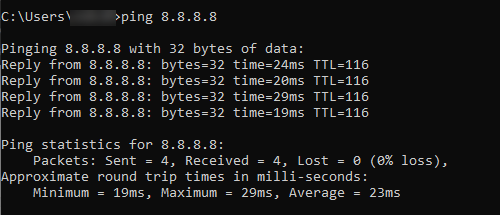
You now have the round trip time of how long it takes to get a response from the pinged server.
Traceroute Command
Another helpful command for network diagnostics is the traceroute command. A traceroute traces a packet’s path, from the starting point to the destination. This is especially handy for troubleshooting connectivity issues. In the following illustration, I’ll be doing a traceroute for the domain name www.example.com and its IP address.
C:\Users\username>tracert 127.0.0.1
C:\Users\username>tracert www.example.com
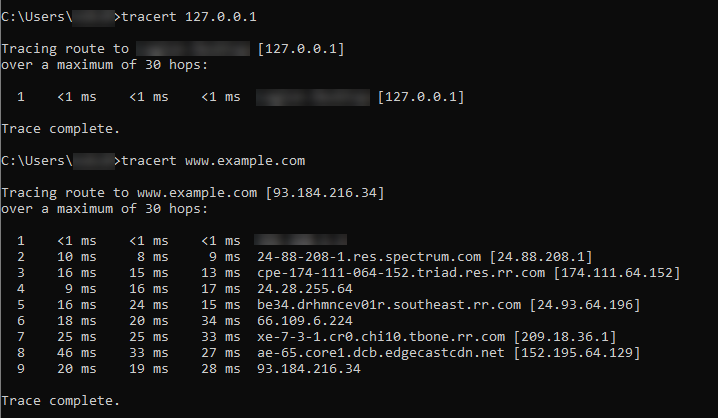
What the command is doing is verifying the route packets take to arrive at their destination. The different stops listed are also called hops. Along with the number of hops, you can see the query resolution time. This information can help you improve your DNS speed or identify problematic routers.

Tip: Command Prompt keeps a history of recent commands. If you need to see a command entered earlier in a session, just hit the up arrow key to scroll through them. See the Gif below for an example of how this works.
DNS Commands for Windows PowerShell
If Windows PowerShell is your preferred utility, this section is for you. These are the PowerShell equivalents of the above Window Commands:
Nslookup – Resolve-DnsName in PowerShell
Nslookup in PowerShell = Resolve-DnsName
PS C:\Users\username>Resolve-DnsName dnsmadeeasy.com (or C:\Users\username>Resolve-DnsName 162.243.68.201)

Tip: To save time in PowerShell, type the first few letters of a cmdlet and then press tab to autofill the rest. For example, if you type “reso” and then hit tab (reso + tab), PowerShell will populate Resolve-DnsName. This works the same with other cmdlets like Test-Connection. Start typing “test-con” then hit tab for Test-Connection, etc.”
DNS Record Lookup in Windows PowerShell
PowerShell uses its Resolve-DnsName cmdlet for record lookups. To specify what record, you must add “-type” to complete the cmdlet.
PS C:\Users\username>Resolve-DnsName dnsmadeeasy.com -Type MX (or any record you choose).

Notice that when I entered -Type or -type, the cmdlet ran the same, so this is not case-sensitive
Ping Command in PowerShell
Ping in PowerShell = Test-Connection
PS C:\Users\username>Test-Connection dnsmadeeasy.com

The results look different, but you still see the source (computer name) and the hops, as well as the time it took to receive a response.
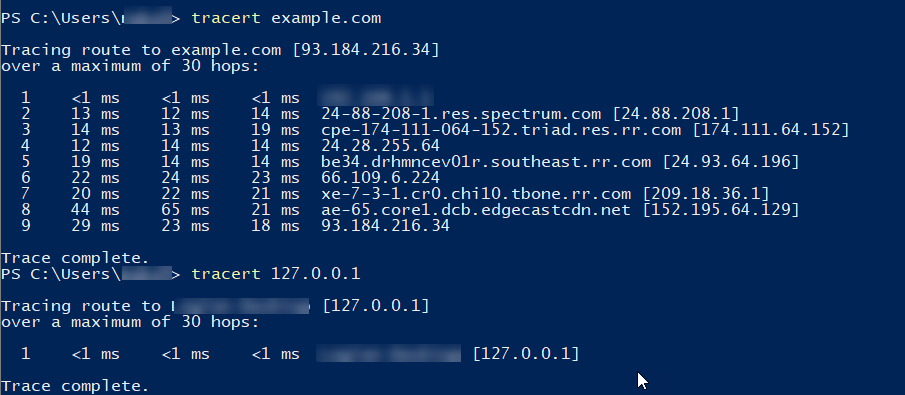
Traceroute in PowerShell
Tracert in PowerShell = tracert – yes, this time, the cmdlet shares the same name as the CMD command.
PS C:\Users\username>tracert example.com
DNS Lookup Tool
Online resources are also excellent for troubleshooting DNS. These tools are especially useful as they’re accessible from anywhere and on any device. For instance, the DNS Lookup Tool by Constellix (our sister company) can retrieve DNS records and run checks based on geographic location. It will also query against any nameserver you specify. The records supported are A, AAAA, CNAME, MX, TXT, NS, SOA, and SRV.
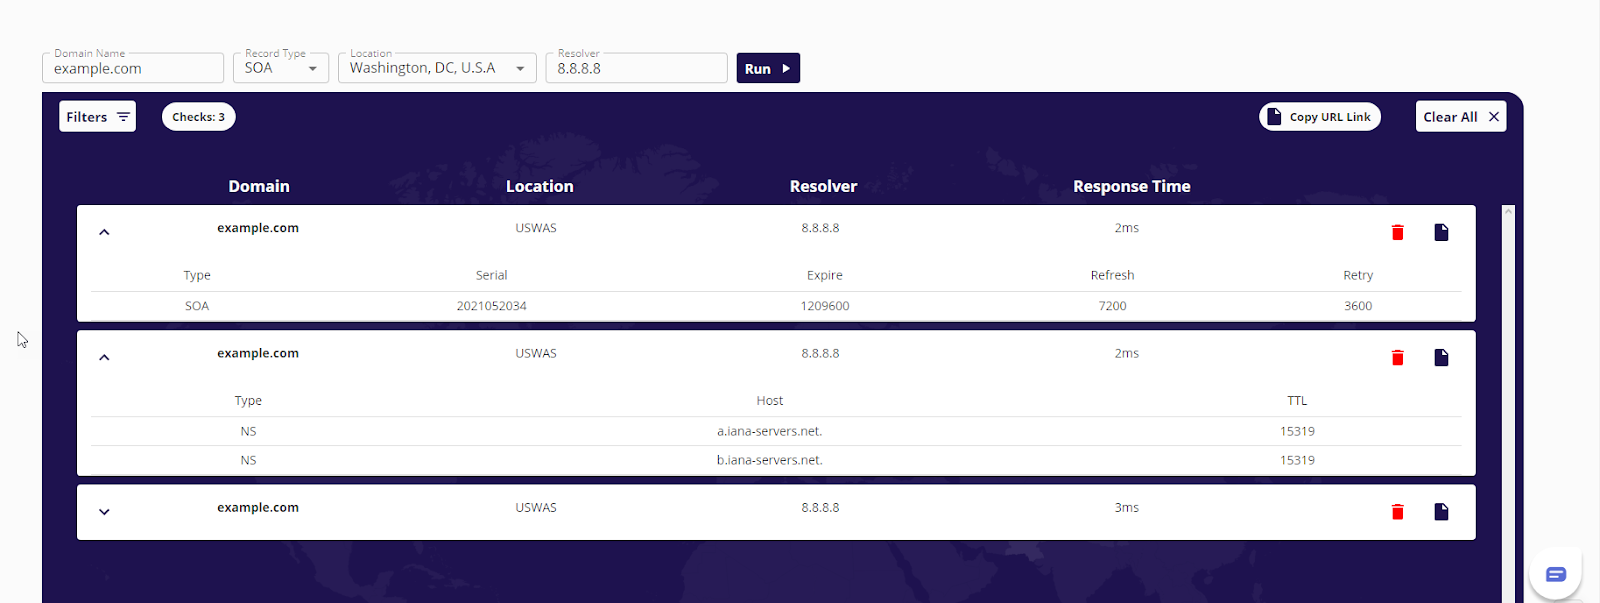
There are some additional perks to using Constellix’s DNS Lookup tool. You can run checks against different domains and/or nameservers in the same session. Results can be filtered by domain, record type, resolver, or location, and you can expand or minimize each check. You can also copy the URL of the results and email it to your team, which is convenient and a huge timesaver.
It’s All in a Shell
With the above options, you can verify your DNS and troubleshoot issues. Key points: Command Prompt, PowerShell, and online DNS tools provide nameserver, record instructions, and other DNS information, but they operate differently. CMD uses single-line commands, whereas PowerShell uses cmdlets and can run batch commands. Resources like Constellix’s online DNS Lookup tool run checks based on the details you enter.
Of course, this is nowhere near a comprehensive guide to Command Prompt or PowerShell. They can both do much more. Below are several links that can help deepen your understanding of either utility.
If you liked this, you might find these helpful:


